

So how do you make those flowers?
First I drew a pattern using a 1 inch square and rounded off the top with a found object that seemed to fit. I am including a free template for this here for those of you who would like it, but maybe you want to make a larger size, and you should know how to do that.


Press them down for about five seconds.

Cut the shape out the size of the freezer paper.

Next cut a square that is about 1/4" larger than your original petal. In this case it is 1 1/4" This can be done without getting it exactly square, as you will be trimming later.
Place one petal and one square right sides together with petal centered.


I am sorry that some of these pictures are blurry. My photography is needing a little work yet. At this point you trim around the outside arch to about 1/8". You also trim the bottom opening even with the petal.

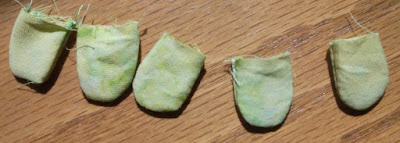
Here it is all trimmed.

This is one of my secret tools in blue. It is a free straw from Culvers. They are super strong and really help turn small appliques or stuffed items right side out. Insert the straw into the opening of the petal. The ball point bodkin above it is used to push it a little way through the straw so that it can be turned.

Here it is being pushed into the straw just enough to get ahold of it and finish turning.

Now take it off and finish turning with the bodkin or something smooth that won't poke a hole in it.

Smooth it out.
You will need five petals for each flower.

Run a gathering stitch with needle and thread through each petal.

Gather all five petals onto thread.

Draw them up snug. They will kind of curl into a circle.

Connect the beginning to the end with a little knot.

Even out the petals so that they lay as symmetric as possible.
f

For the centers I use either buttons or yo-yos. Making yo-yos allows for matching fabrics in your project and are very inexpensive when compared to buttons. I used the smallest yo-yo maker by Clover. I will include a template for one the size of this project with the petal template here.

Then you either sew your button on or applique down your yo-yo, whatever side is more pleasing to you.

Flower with button Center embellishment on apron
Flower with yo-yo center

Flower embellishment on purse

Close up of flower on purse
Adorable!!!
ReplyDeleteVery cute! I will have to try these one day :) Thanks so much for sharing!
ReplyDeletelv,
Joy